A plain, frameless mirror is like a blank canvas—full of potential and waiting for a creative touch. While store-bought framed mirrors can be beautiful, they often come with a hefty price tag and may not perfectly match your unique style. The solution? Roll up your sleeves and embark on a do-it-yourself (DIY) project. Creating your own mirror frame is a rewarding, budget-friendly way to transform a simple looking glass into a personalized piece of art.
This guide is packed with affordable and creative DIY mirror frame ideas for every skill level. Whether you’re drawn to rustic charm, modern elegance, or eclectic whimsy, you’ll find a project that speaks to you. We’ll provide step-by-step guidance and practical tips to help you craft a stunning frame that reflects your personality and elevates your home decor.
Why Choose a DIY Mirror Frame?
Before we get into the nuts and bolts of crafting, let’s explore why going the DIY route is such a fantastic choice for your home.
- Unbeatable Affordability: This is one of the biggest draws. You can upcycle materials you already own or use inexpensive craft supplies to create a high-end look for a fraction of the cost of a retail mirror. It’s a cornerstone of affordable home decor.
- Endless Customization: The only limit is your imagination. You control the size, shape, color, texture, and overall style. You can perfectly match your frame to your room’s color palette, existing furniture, or a specific design theme.
- A Sense of Accomplishment: There’s a special pride that comes from making something beautiful with your own hands. Your custom mirror will not just be a decorative item; it will be a story and a testament to your creativity.
- Eco-Friendly Upcycling: DIY projects are a great opportunity to give new life to old objects. From discarded wood and old books to fabric scraps and seashells, upcycling is a sustainable way to decorate.
Getting Started: Your DIY Mirror Toolkit
While each project has specific requirements, having a basic DIY kit on hand will make the process much smoother.
- The Mirror: You can start with an inexpensive frameless mirror from a craft or big-box store. Thrift stores are also treasure troves for old, dated mirrors with solid foundations that are ripe for a makeover.
- Adhesive: A high-quality, strong adhesive is crucial. A heavy-duty construction adhesive (like Liquid Nails) is great for heavier materials, while a hot glue gun is perfect for lighter objects and quick applications. For mosaic projects, you’ll need tile adhesive.
- Measuring Tape and Pencil: Accuracy is key. Measure twice, cut (or glue) once!
- Safety Gear: Always wear safety glasses, especially when cutting materials or working with strong adhesives. Gloves are also a good idea.
- Base Frame (Optional): Some projects involve decorating an existing simple frame. You can build a simple frame from MDF or plywood, or buy an inexpensive one to use as your base.
Creative Mirror Frame Ideas You Can Make Today
Here are some of our favorite creative mirror frame ideas, broken down by style and with instructions to guide you.
1. Rustic and Natural Charm
Bring the beauty of the outdoors inside with frames made from organic materials. These projects are perfect for farmhouse, coastal, bohemian, and rustic aesthetics.
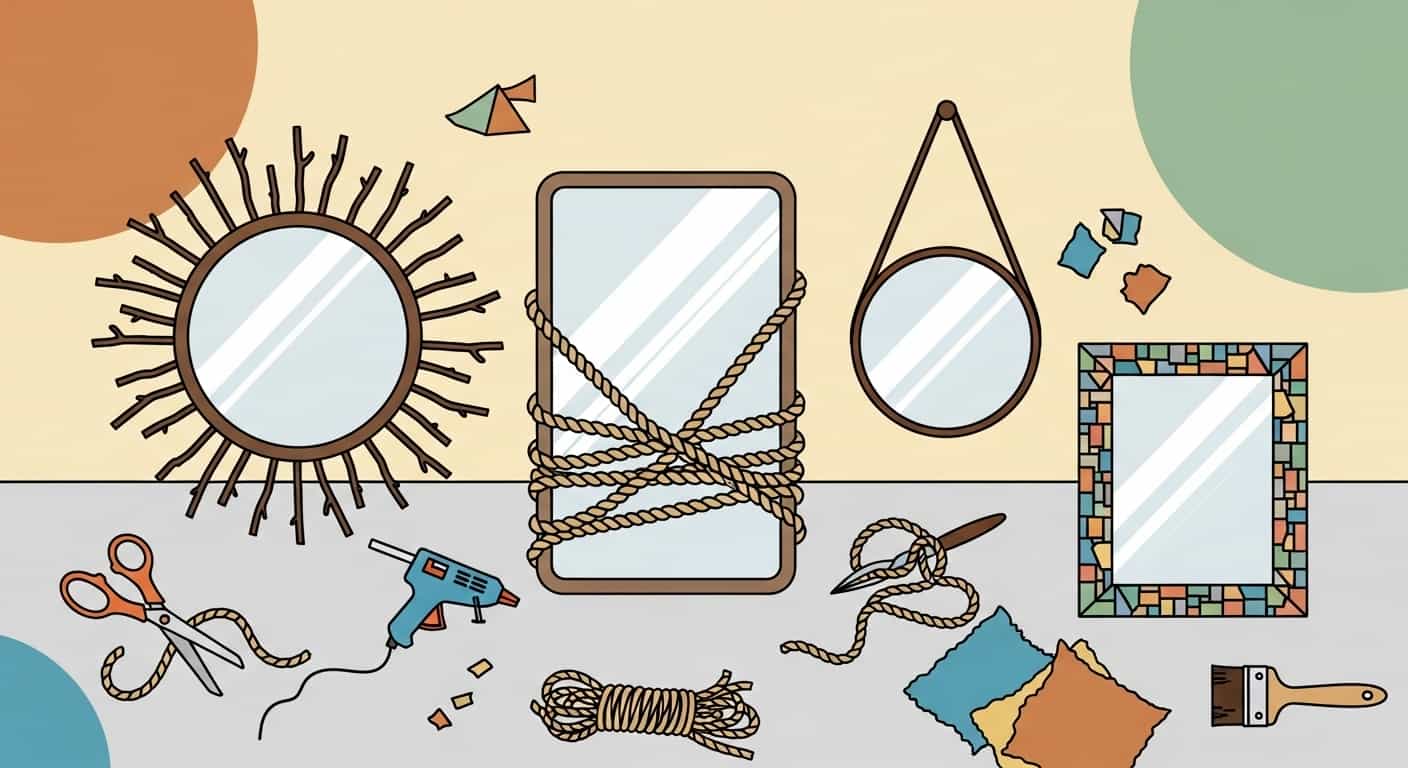
Sunburst Twig Mirror
This classic design adds texture and a sculptural element to any wall.
- Materials: A round frameless mirror, a sturdy backing (like plywood or MDF cut into a circle a bit larger than your mirror), twigs or small branches of varying lengths, a strong construction adhesive, and pruning shears.
- Step-by-Step:
- Clean your twigs and let them dry completely. Use the pruning shears to trim them into a variety of lengths. For a true sunburst effect, you’ll want some long and some short pieces.
- Center and glue your mirror onto the circular backing. Let the adhesive cure according to the package directions.
- Begin arranging your twigs around the mirror’s edge on the exposed backing. Start with the longest twigs, placing them at the 12, 3, 6, and 9 o’clock positions to create your primary “rays.”
- Fill in the spaces with progressively shorter twigs, layering them to create a full, textured look. Play with the arrangement until you are happy with the design.
- Once you have your layout, glue each twig securely in place with construction adhesive. Let it dry completely before hanging.
Nautical Rope Frame
Perfect for a coastal theme or to add a touch of texture to a modern space.
- Materials: A round or rectangular mirror with a simple, flat frame (or a frameless mirror glued to a backing), thick jute or sisal rope (enough to wrap the frame multiple times), and a hot glue gun with plenty of glue sticks.
- Step-by-Step:
- Start at a corner or a less visible edge (like the bottom). Apply a generous line of hot glue and press the end of the rope firmly into it.
- Carefully begin wrapping the rope tightly around the frame. Work in small sections, applying a line of glue and then pressing the rope into place.
- Ensure each new wrap is snug against the previous one to avoid gaps. For rectangular mirrors, be extra careful at the corners to maintain a neat appearance.
- When you reach the end, cut the rope and secure the final end with a liberal amount of hot glue, tucking it in neatly.
2. Modern and Industrial Edge
For those who love clean lines, metallic finishes, and a minimalist feel.
Faux Concrete Frame
Get the heavy, textural look of concrete without the weight and complexity.
- Materials: A mirror with a wide, flat wooden or MDF frame, concrete-effect spray paint or a tub of pre-mixed concrete skim coat, a putty knife, and fine-grit sandpaper.
- Step-by-Step (using skim coat):
- Tape off the mirror glass carefully with painter’s tape to protect it.
- Using a putty knife, apply a thin, uneven layer of the concrete skim coat over the entire frame. Don’t aim for perfection; the trowel marks and imperfections are what create the authentic texture.
- Let the first layer dry completely. If you want more texture, you can add a second, thinner layer.
- Once fully dry, lightly sand any very rough or sharp spots with fine-grit sandpaper for a smoother finish.
- Remove the painter’s tape and admire your industrial-chic creation.
Leather Strap Hanging Mirror
This Scandinavian-inspired design is minimalist, chic, and surprisingly easy to make.
- Materials: A round frameless mirror, a long leather belt or a strip of craft leather, two heavy-duty D-rings, strong epoxy (suitable for glass and metal), and a decorative wall hook or knob.
- Step-by-Step:
- Measure the back of your mirror and mark two equidistant points on the upper half where you will attach the D-rings.
- Following the epoxy instructions, securely glue the flat side of the D-rings to the back of the mirror at your marked spots. Ensure the rings are oriented correctly to hold the strap. Let the epoxy cure fully, which may take 24 hours.
- Once the epoxy is set, thread your leather strap through the two D-rings.
- Install your decorative hook on the wall, ensuring it’s anchored properly to support the mirror’s weight.
- Hang the mirror by looping the leather strap over the hook. Adjust the strap so the mirror hangs straight.
3. Eclectic and Artistic Frames
Let your personality shine with these unique and colorful DIY mirror frame ideas.
Broken China Mosaic Frame
Turn chipped plates or thrift store finds into a vibrant, one-of-a-kind mosaic.
- Materials: A mirror with a wide, flat frame, old ceramic plates or tiles, a hammer, a cloth or towel, safety glasses, tile adhesive, a small spatula or putty knife, and grout.
- Step-by-Step:
- Put on your safety glasses. Wrap a ceramic plate in an old towel and carefully hit it with a hammer to break it into smaller pieces. Continue until you have a variety of shapes and sizes.
- Tape off the mirror glass. Spread a thin layer of tile adhesive onto a section of the frame.
- Begin pressing your ceramic pieces into the adhesive, leaving a small gap between each piece for the grout. Arrange them like a puzzle, mixing colors and shapes for a dynamic look. Continue section by section until the entire frame is covered. Let the adhesive dry for 24 hours.
- Mix your grout according to the package directions. Spread it over the entire frame, pressing it into the gaps between the ceramic pieces.
- After about 15-20 minutes, use a damp sponge to gently wipe the excess grout off the surface of the tiles. Be careful not to pull the grout out from the gaps.
- Let it cure completely, then buff the tiles with a dry cloth to remove any remaining haze.
Fabric Decoupage Frame
Coordinate your mirror perfectly with your room’s textiles.
- Materials: A mirror with a simple wooden frame, a piece of fabric larger than the frame, Mod Podge or decoupage glue, a foam brush, and a craft knife.
- Step-by-Step:
- If the frame is dark and your fabric is light, prime the frame with white paint first to prevent the color from showing through.
- Lay your fabric flat, pattern-side down. Place the frame on top of it. Cut the fabric, leaving about a 2-inch border around the outside and inside edges of the frame.
- Apply a generous layer of Mod Podge to the front of the frame. Carefully lay the fabric over it, smoothing it out from the center to eliminate air bubbles.
- Flip the frame over. Cut slits in the fabric at the corners. Apply Mod Podge to the back of the frame and wrap the fabric edges around, pulling them taut. Do the same for the inner edges.
- Apply one or two top coats of Mod Podge over the entire fabric-covered surface to seal and protect it. Let it dry completely.
Your Home, Your Masterpiece
A mirror doesn’t have to be a simple, functional object. It can be a vibrant expression of your style, a conversation starter, and a focal point of your decor. With these DIY mirror frame ideas, you have the power to create affordable home decor that is truly your own.
Choose a project that excites you, gather your materials, and don’t be afraid to experiment. The beauty of DIY is that each piece is perfectly imperfect and infused with character. Get ready to transform a simple mirror into a treasured piece of home decor.